I’m done dragging a USB cable just to watch pose/odometry update in realtime.
So I built a tiny UART → Wi-Fi bridge with an ESP8266 and turned my tracker into a wireless broadcaster.
This post shows the wiring + a minimal UDP streamer + a 10-line PC receiver to verify it works.
Using RoboBaton Mini as the example — but this works for basically ANY UART VIO/IMU/odometry sensor.
Pipeline: RoboBaton Mini UART output → ESP8266 reads frames → Wi-Fi to any receiver on your LAN.
What you’ll get
· No tether: pose data becomes wireless.
· Any receiver: laptop / desktop / Raspberry Pi / phone (same LAN).
· Low latency: UDP broadcast or unicast. (Switch to TCP/WebSocket if you want reliability.)
Hardware
· RoboBaton Mini ×1 (or any UART pose/odom sensor)
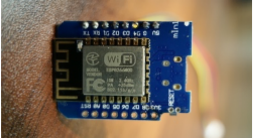
· ESP8266 dev board ×1 (e.g. Wemos D1 mini)
· GH1.0 5-pin cable / breakout (depends on your setup)
· Dupont wires / soldering as needed
ESP8266 dev board (example).
Wiring (important)
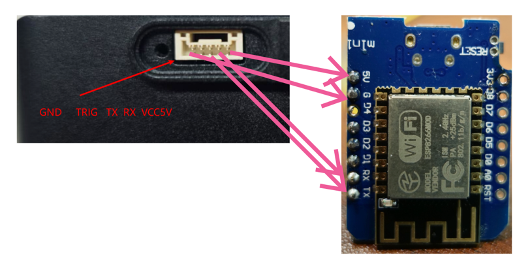
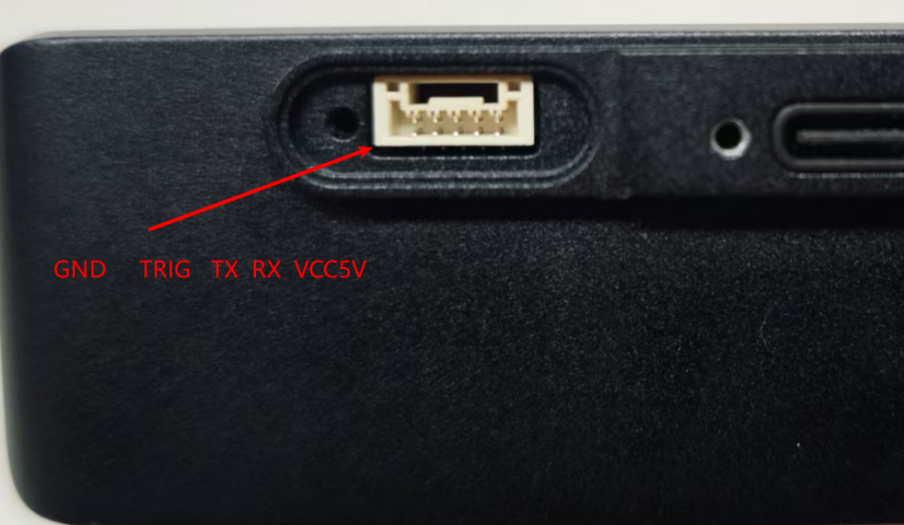
RoboBaton Mini UART uses a GH1.0 5-pin connector. Pin order (from the side near the screw hole) is: GND, TRIG, TX,RX, 5V.
Pinout + wiring map (replace the image path with your own Reddit upload URL if needed).
Voltage warning: UART signal level is 3.3V. Do not treat “5V” as UART logic. “5V” is the power pin. TX/RX are 3.3V logic signals.
Minimal wiring for “read pose → stream over Wi-Fi”
· Baton GND → ESP GND
· Baton TX → ESP RX (cross)
· Baton RX → ESP TX (cross; optional if you don’t send commands back)
· Baton 5V → ESP 5V/VIN (optional, to power ESP; use external power if unstable)
Do I need TRIG?
For pure streaming,I only used GND/TX/RX. TRIG becomes useful if you also want to send control frames / trigger behaviors.
Serial settings & frames
· Baud rate: 115200
· Device outputs pose frames periodically.
· Fastest way to get started: forward raw frames over UDP, parse on the PC side.
ESP8266 firmware idea: frame sync → UDP send
Why UDP? Lowest friction and low latency. Pose is streaming data — occasional packet loss is usually fine. If you need guaranteed delivery, swap UDP for
TCP/WebSocket later.
// Pseudo-code (Arduino / PlatformIO):
// 1) Serial(115200) read UART
// 2) sync on frame header + read fixed length (or read by length)
// 3) UDP send to broadcast or a specific receiver IP:PORT
#include <ESP8266WiFi .h>
#include <WiFiUdp .h>
const char* ssid = "YOUR_WIFI";
const char* pass = "YOUR_PASS";
WiFiUDP udp;
const uint16_t UDP_PORT = 7777;
IPAddress broadcastIP(192,168,1,255);
// Frame header/length: follow RoboBaton UART demo doc .
// These constants are placeholders for the “pose output frame” .
const uint8_t H1 = 0x66;
const uint8_t H2 = 0x27;
const int FRAME_LEN = 61;
uint8_t buf[FRAME_LEN];
void setup() {
Serial.begin(115200);
WiFi.mode(WIFI_STA);
WiFi.begin(ssid, pass);
while (WiFi.status() != WL_CONNECTED) delay(200);
udp.begin(UDP_PORT);
}
void loop() {
if (Serial.available() > 0) {
int b = Serial .read();
if (b == H1) {
while (Serial.available() == 0) {}
int b2 = Serial .read();
if (b2 == H2) {
buf[0] = H1; buf[1] = H2;
int need = FRAME_LEN - 2;
int got = Serial .readBytes((char*)buf + 2, need);
if (got == need) {
udp.beginPacket(broadcastIP, UDP_PORT);
udp .write(buf, FRAME_LEN);
udp .endPacket();
}
}
}
}
}
Receiver (PC): 10-line UDP sanity check
import socket
PORT = 7777
s = socket.socket(socket.AF_INET, socket .SOCK_DGRAM)
s.bind((“0.0.0.0“, PORT))
print(“listening on”, PORT)
while True:
data, addr = s.recvfrom(4096)
print(“recv”, len(data), “bytes from”, addr, “head=”, data[:2]
If you consistently receive stable-length packets (and the header matches),the wireless bridge is working. Then you can parse floats, plot trajectories, convert to ROS2 Odometry, or build a web viewer.
Common pitfalls
· TX/RX swapped: cross them (TX → RX, RX →TX).
· Power brownouts: ESP8266 Wi-Fi bursts can reset weak power setups; use stable 5V or external power.
· Broadcast not received: try unicast to the PC IP first, then switch to broadcast.
· Frame desync: use strict header sync + fixed length (and checksum if available).
Next upgrades (optional)
· Add device_id + timestamp; support multiple trackers simultaneously.
· Wrap payload into JSON (easy debugging), or keep binary (fastest).
· ROS2 bridge: publish nav_msgs/Odometry.
· WebSocket viewer: real-time pose + trajectory in browser.
Meet us:
YouTube: MRP Business
Reddit: reddit.com/user/Even_Chapter_9358
Official Website: https://myrobotproject.com
Discord community: https://discord.gg/WBTPcRMC